1. Tube-End Joint Design
The importance of talking through tube-end joint design options with your fabricator early in the process cannot be overstated. An experienced heat exchanger manufacturer takes several factors into consideration before a project is started. Should the tube-end joint be as robust as possible to avoid leaks at all costs, even if that design is more expensive? Or, is this exchanger in a less critical service, with overall budget being the most important factor? The four most common options for sealing the tube-end joint are: expanded only, seal welded and expanded, strength welded without expansion, and strength welded and expanded. Table 1 shows a few pros and cons of each method.
The tube ends can be mechanically sealed to the tubesheet without welding, using a process called expansion. Expansion involves using a rolling-pin system (an expander) to cold form the tube from the inside, increasing its diameter and creating an interference fit between the tube and tubesheet hole. The amount of expansion is measured in terms of tube-wall thickness reduction. For example, if starting with a 0.065″ wall carbon steel tube, the common amount of expansion would be 4 to 6 percent. This method involves compressing the tube against the tubesheet hole until the tube wall measures 0.061 to 0.062″ locally. Table 2 shows the recommended amounts of wall reduction for various materials.
Although tube expansion is the most economical option, it is also the least robust type of tube-end joint design. This joint type should be selected for noncritical applications or for those where tubes may need to be replaced in the future.
For additional leak protection, the tube ends can be seal welded and expanded. There is no calculated size for seal welds. There is, simply, a minimal weld that provides a seal at the joint. This type of weld depends on the additional step of expansion to provide the full strength of the joint.
Strength welds are designed to be as strong as the tube, without any expansion required. These welds are larger than seal welds and usually require multiple weld passes. For the most critical applications, the tube ends can be strength welded and expanded to provide the most leak protection. This is the most expensive type of tube-end joint, but it eliminates crevice crack corrosion that can be caused by product building up between the outside of the tube and the tubesheet.
When strength welds are selected, it is important to consider chamfers of the tubesheet holes early in the design stage (figure 1). These grooves, cut in the tubesheet, allow space for a groove weld (if required in the strength weld design) and are crucial to weld quality. With the chamfer, some of the required weld can be made in the chamfer (making a groove weld) and some in the fillet. The angle, shape and depth of the chamfer design can be varied to allow the welder to achieve full weld penetration without damaging the relatively thin tube.
Carefully determining proper tube projection — how far past the tubesheet the tube extends — also is important for tube-joint design. Most designs specify some projection, but as tube projection increases, access to weld area is reduced, making the root pass weld more challenging. Too little of a projection presents its own problems, making a sound fillet weld to the tubesheet more difficult.
| Tube-End Joint Type | Pros | Cons |
| Expanded Only |
|
|
| Seal Welded and Expanded |
|
|
| Strength Welded, Not Expanded |
|
|
| Strength Welded and Expanded |
|
|
TABLE 1. The pros and cons of the four options for sealing the tube-end joint are compared. Source: Ward Engineering
2. Automated or Manual Welding?
Another important decision to make in the early stages of a heat exchanger project is whether to specify manual or automated welding of the tube-end joints. Both manual and automated welding have advantages, but some drawbacks need to be considered carefully in order to select a process that balances speed with the ability to customize and provide reliability. If a fabricator was going to build the exact same heat exchanger repeatedly, the choice might be easier: an automated welding process may be the best choice for an assembly-line production process. Orbital welding, which is an automated gas tungsten arc welding (GTAW) process, requires more initial setup time and test runs. But, once everything is dialed in, it can be more consistent than manual welding. On larger units, it may also save time. The downside to automated welding is that it can be challenging to adjust for different joint configurations and plan for the maintenance of many intricate parts in the system. For example, maintenance items and the life of consumables can change the parameters dramatically in orbital welds. Something as minor as wear on a welding tip could lead to significant problems in the weld. As the tungsten starts to dull and the operator is not aware of it, it will show a gradual-but-consistent degradation. In a tube bundle with hundreds of welds, the bundle may not pass final inspection, leading to delays in delivery. Worse yet, if the damage goes undetected, it could lead to premature failures and bigger problems down the road.
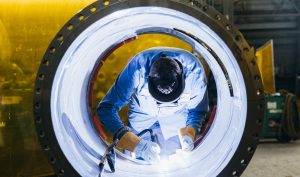
Although manual welding has its own drawbacks — the process is more time intensive than automated welding and can be more expensive — it is preferred by some fabricators and end users for highly technical tube-end welds. Manual welding allows manipulation of the weld puddle to adjust as necessary (figure 2). A skilled tube-joint welder can adjust the amount of filler being fed, the volts and amps being used, travel speed of the torch and the distance of the torch to the tubesheet while welding the joint. Manual tube-end joints should always be welded with uphill progression only, which is not possible with orbital welding. As the welder moves from the six o-clock position on the tube-end toward 12 o’clock, being able to adjust these parameters allows the experienced welder to produce consistent joints that will pass even the most stringent testing.
| Tubing Material | Target Percent Wall Reduction |
| Carbon and Low Alloy Steel | 5 to 8 |
| Stainless Steel | 5 to 8 |
| Duplex Stainless Steel | 2 to 6 |
| Titanium and Work Hardening Non-Ferrous | 4 to 6 |
| Admirality and Non-Work Hardening Non-Ferrous | 6 to 9 |
| Copper and Copper Alloys | 7 to 10 |
TABLE 2. The tube ends can be mechanically sealed to the tubesheet without welding using a process called expansion. Recommended amounts of wall reduction for various materials are shown. Source: Ward Engineering
3. Cleaning Tubes and Tubesheet
Regardless of which welding process is selected, there is one step in preparation that should be thought of as a requirement rather than a consideration. Cleaning the tubes and tubesheet is vital to producing sound tube-end welds and dependable process heating equipment. Working with a fabricator that knows and employs best practices for prepping each type of material will help ensure that welds are reliable. For example, carbon steel tubing often is slightly rusted when it arrives at a fabrication shop. Any oxidation needs to be thoroughly removed using proper techniques that will not damage the tubes prior to welding. In addition, carbon steel typically is coated in oil that, if left on the tubing, will lead to porosity in welds. Less depth of the weld due to pockets of porosity can create premature failures of these welds. Even with oil-free carbon steel, the fabricator will need to remove any rust on the tube and tubesheet before it is loaded into the tube bundle — and have a plan for welding it before the oxidation returns. Other materials of construction may not arrive covered in oil or rust, but they still call for special attention prior to welding. When working with stainless steels and alloys, it is important to box or shrink wrap the tubes to protect them from dust, oils and the environment until they are ready to be loaded in the tube bundle. At that point, these critical heat transfer components will need to be wiped down with solvent to make sure that any debris or oils are removed prior to joining them with the tubesheet. The tubesheet requires the same level of care. Cleaning it removes dust and debris that could contaminate tube-end welds. Without properly prepped material, it is impossible to create a high quality weld joint. A lot can go wrong with a heat exchanger when even a single weld fails.
4. Tube Welding and Expansion
Cleaning is certainly an important step when preparing tube and tubesheet for welding, but knowledgeable heat exchanger fabricators understand other nuances, including the importance of the welding and expansion sequence. Welding creates off-gases that can damage welds if not vented properly. When tubing is expanded into a tubesheet hole first, and that region is effectively sealed, the only way these gases can escape is to pass back through the weld itself, also known as blowback. This can lead to porosity and other defects in the weld, especially as the weld is completed or on multiple-pass welds. Blowback also can cause equipment damage and safety issues. For these reasons, many fabricators recommend welding tubes to the tubesheet prior to expansion. It is important for end users and fabricators to discuss details such as the tube welding and expansion sequence early in the process to avoid delivery delays and quality problems.

FIGURE 2. A tubesheet with chamfers at the tube holes allows strength welding.
5. Testing and Inspection
Other problems can arise in the tube-end welding process such as oxidation (or sugaring) of the tubes, defects in welds or improperly sized tube-end welds. Any of these issues may result in cracked or broken welds, premature failures or increased susceptibility to corrosion. In more severe situations, defective welds might result in the catastrophic failure of the tubesheet. Although experienced fabricators take steps to avoid these and other issues, they also depend on proven inspection and evaluation procedures to catch problems before they can turn into worst-case scenarios. In some cases, these problems can be caught early in the process and avoided with a tube-end joint mockup. The mockup is essentially a practice run with sample tubes and tubesheet that mimics the exact tube-end weld process that will be used on the production unit. Cross-sections of the sample tube-end welds are cut and analyzed under a microscope (figure 3). Laboratories are able to etch the weld and measure the amount of penetration, fillet weld length and other details. Corrosion testing, ferrite measurements or other tests can be performed on each pass of the weld. Mechanical tests that pull the tube-ends apart are used to determine the strength of the weld. The advantage of the mockup is that these destructive laboratory tests cannot be performed on a production unit. While mockups provide one method of avoiding problems before actual unit fabrication begins, heat exchanger manufacturers have developed a number of other tests to ensure quality tube-to-tubesheet joints. Dye-penetrant and helium leak testing are two of the most common tests employed to detect flaws in tube-end welds. Dye-penetrant testing is a surface inspection. Dye is placed on the surface of the weld and, if there is a flaw, it will soak down into the defect. After the dye is cleaned from the surface, any remaining dye makes a flaw clearly visible. This is a relatively simple test that detects problems on the surface of the metal, but it will not detect flaws beneath the surface of a weld. The helium leak test fills the shell side of the heat exchanger with 5 to 10 psi of helium. Then a helium detector is placed near the tube joints to check for any helium above what is common in the atmosphere. If there is helium coming through the joint, then there is a flaw in the weld. Helium is used because it is a small atom and it can get through very tiny cracks or pin holes that even a water molecule would not be able to fit through. Perhaps the best method for final inspection of production tube welds is radiographic (X-ray) testing. This specialized equipment is placed over the tube-end joint and produces a circular digital image of the tube-end weld using X-rays. While this test is not able to measure the depth of a weld, it can spot hidden flaws that could go undetected in dye-penetrant and helium leak tests. For truly critical tube-end joints, especially in lethal service applications, tube-end radiography is one way to ensure the integrity of the welds and the quality of the heat exchanger prior to delivery. Following these best practices for design, fabrication, and testing and evaluation of a heat exchanger will improve the odds of getting the fabrication of the tube-ends right the first time.

FIGURE 3. A micrograph of an etched mockup tube-end weld is shown. While mockups provide one method of avoiding problems before actual unit fabrication begins, exchanger manufacturers also have developed a number of other tests to ensure quality tube-to-tubesheet joints.
Author’s Note:
For further information, reference the ASME Boiler and Pressure Vessel Code, Section VIII Division 1 and the TEMA (Tubular Exchanger Manufacturer’s Association) standard.


